We use cookies to make your experience better. To comply with the new e-Privacy directive, we need to ask for your consent to set the cookies. Learn more.
How to Change Watch Straps
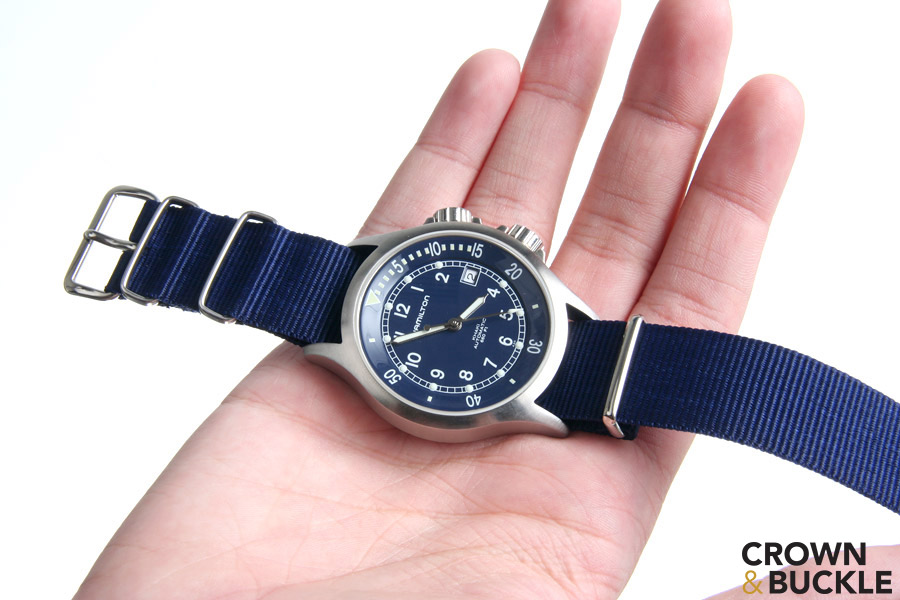
Changing your watch strap is a fun and simple process that can reinvent the look of your watch. With a mixture of patience, practice, and the right tools, you will be an expert in no time!
Installing NATO Straps
Please note: the method of installation in the videos does not apply to Leather NATO straps. Please reference the step by step guides below for Leather NATO installation.
Step by Step Guides
In addition to the videos above, the guides below will help you with the removal of your old strap or bracelet, as well as the installation of your new watch strap. It's an easy process that can be completed in just a few minutes. Some general tips:
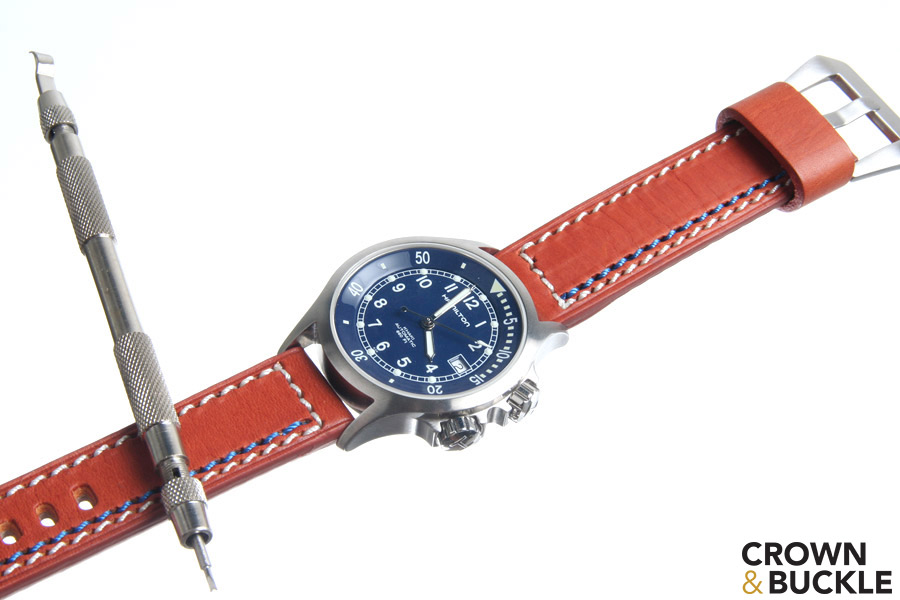
- You will need a spring bar tool in order do these steps.
- Work on a nice open surface, such as a kitchen table.
- Lay down a towel to protect the watch, and to keep things from rolling away.
- Always work from the back/under side of your watch.
- Don't rush! Patience is key.
To view any topic, click on the title and the instructions will expand below.
Installation
- Installing a Leather Strap
STEP 1
Install the spring bars into each end of the strap. Be sure to push them all the way in so they are centered inside the strap.
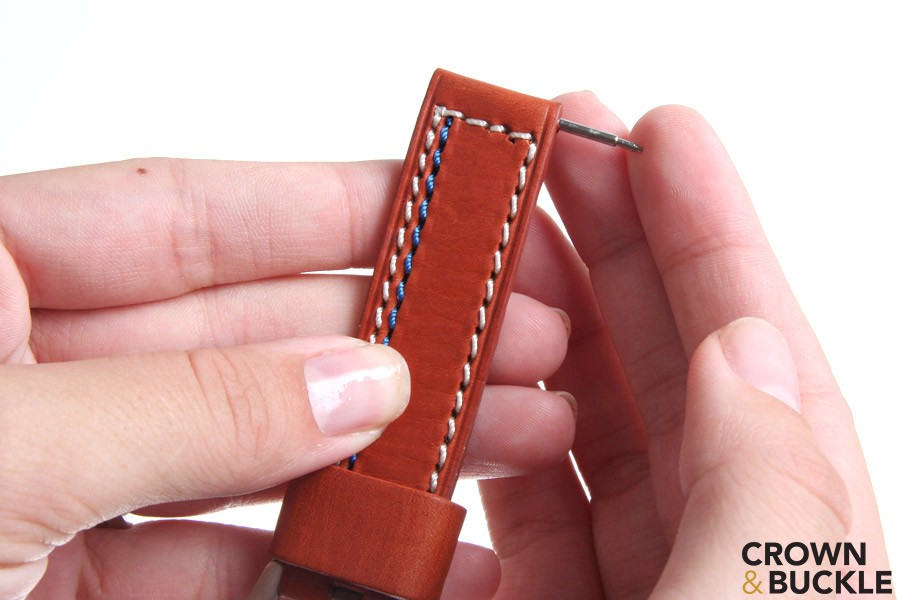
STEP 2
Install the short end of the strap (the end with the buckle). It goes on the top of the watch (the 12 o'clock end). From the back side of your watch, insert one end of the spring bar into the hole on the watch lug.

STEP 3
Use your spring bar tool to compress the other end of the spring bar, so it slides inside the watch lug. Make sure both ends of the spring bar securely snap into their holes, or the strap will fall off the watch.

STEP 4
Repeat the process on the other side of the watch. Remember, the long end of the strap goes on the bottom of the watch (the 6 o'clock end). You are all finished!
- Installing a Nylon NATO
Please note: These instructions do not apply to Leather NATOs, which will likely be scratched by the watch case if "pulled through" the spring bars. For leather NATOs, or for nylon straps on watches with tight clearance between the spring bar and watch case, use the "Installing a Leather NATO" instructions further below.
STEP 1
First, seat one end of the spring bar into the lug hole. Then, using your spring bar tool, compress the other end by grabbing onto the ridge, making sure both ends seat properly. Repeat with the second spring bar.

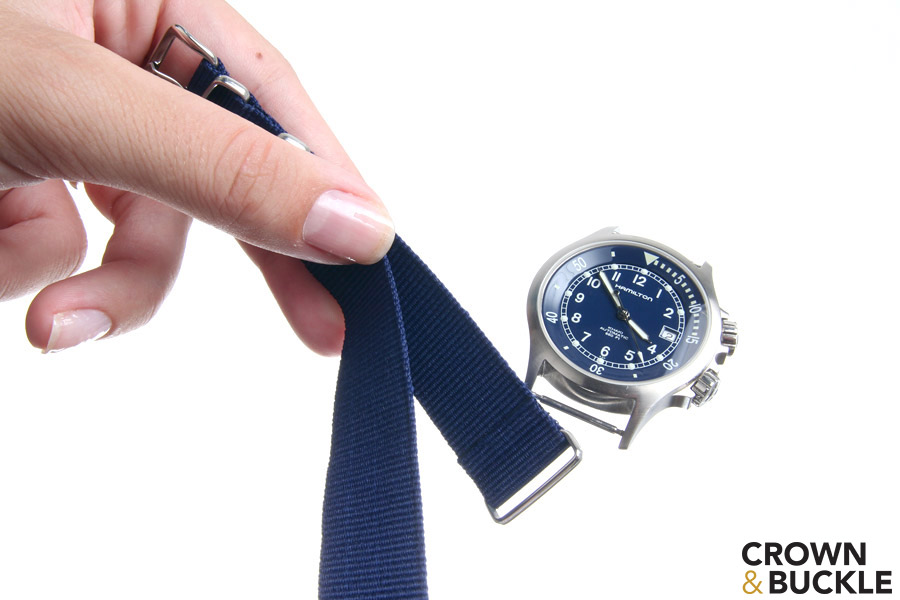
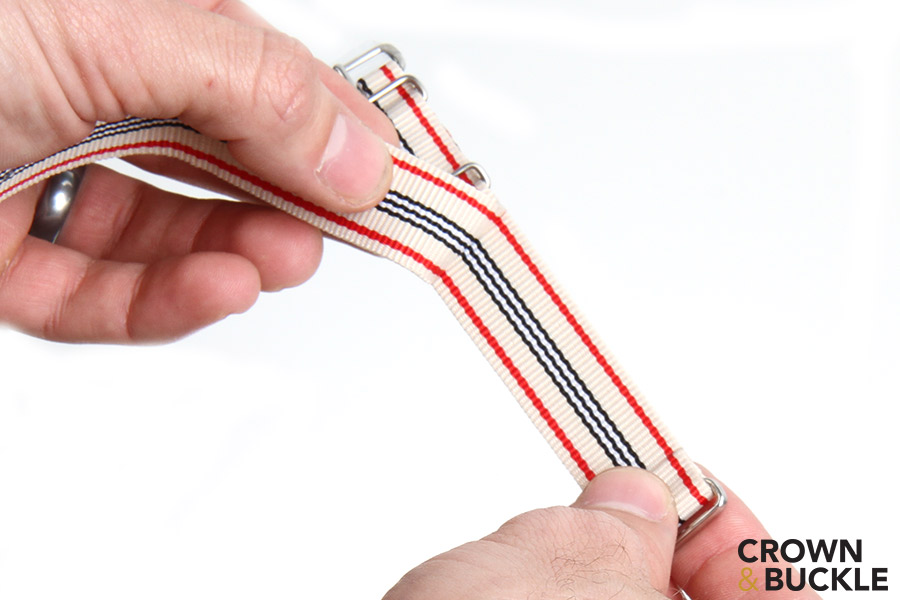
STEP 2
Pull the long part of the strap out of the floating keeper, so the two layers of the strap are separated. * This does not apply to "3-ring" or single layer straps.
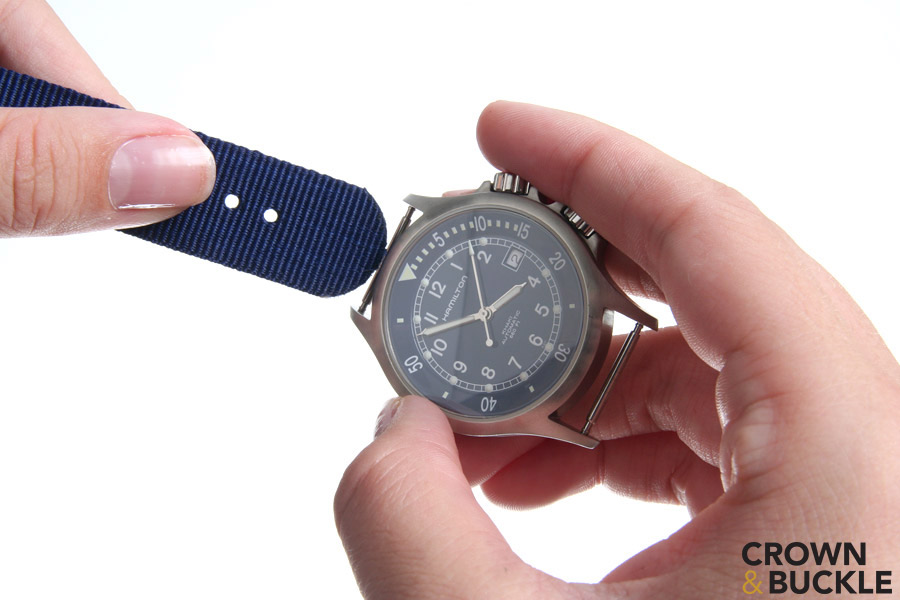
STEP 3
Beginning at the 12 o’clock side of the watch, insert the long end of the strap between the spring bar and the watch case (from the top side, towards the bottom side), and pull it all the way through.
STEP 4
On the 6 o'clock side of the watch, continue threading the strap through the other spring bar (from the bottom side, towards the top side), and pull tight.

STEP 5
Finish it off by pulling the strap back through the second layer keeper. * This does not apply to "3-ring" or single layer straps.

STEP 6
Adjust the watch head on the strap so it is centered between the keepers, and you are all finished! To change between NATO straps, just follow these steps in reverse. There is no need to remove the spring bars again.
- Installing a Leather NATO
To install a Leather NATO strap, you will need to remove the spring bars from the watch. Otherwise, there is a high risk of damaging the surface of the leather strap if it is "pulled through" the spring bars (as a nylon NATO typically is).
Using your spring bar tool, remove the spring bars from the watch. Separate the two layers of the NATO by pulling the long end through the floating keeper. Next, place the strap within the lugs of the watch, making sure it is oriented and positioned properly. Working from the back side, compress and re-install the spring bars into the lugs to secure the strap in position. Lastly, pass the long end of the strap through the floating keeper again.
This method takes a little longer, but it ensures you won't end up with any damage to the leather from rubbing on the watch case. This method is also preferred for nylon straps being installed on a watch with minimal clearance between the spring bars and watch case.
Removal
- Removing a Metal Bracelet
STEP 1
This step is optional, but it makes life easier. On the clasp of the bracelet, compress and remove the micro-adjustment spring bar from the clasp using the pusher end of your spring bar tool. This will allow the bracelet to open up, giving you clear access to the back of the watch.
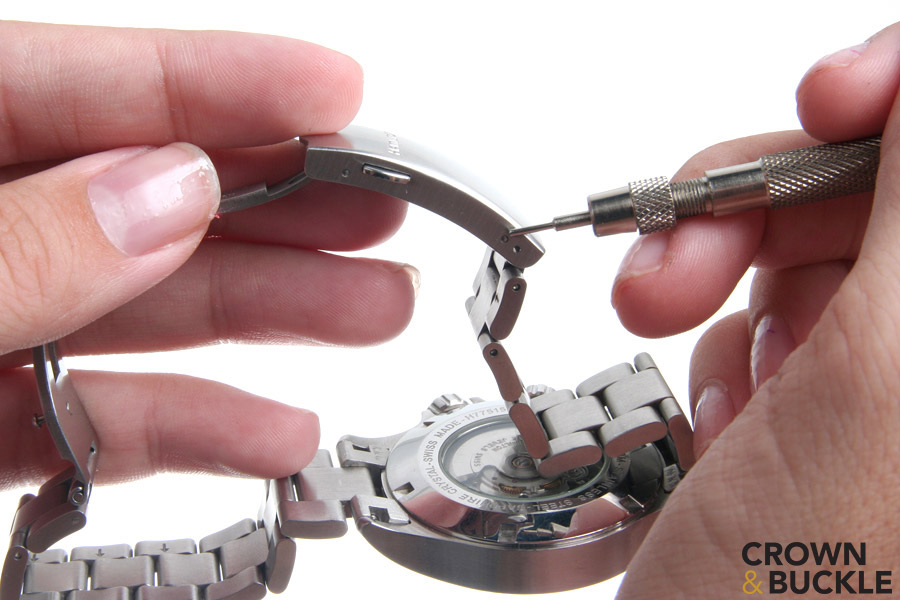
STEP 2
On the back side of the watch, where the bracelet meets the watch case, there will be a recess on each side. These recesses let you insert the forked end of your tool, mating with the spring bar ridge. Apply pressure away from the watch case (towards the bracelet) to compress the spring bar.
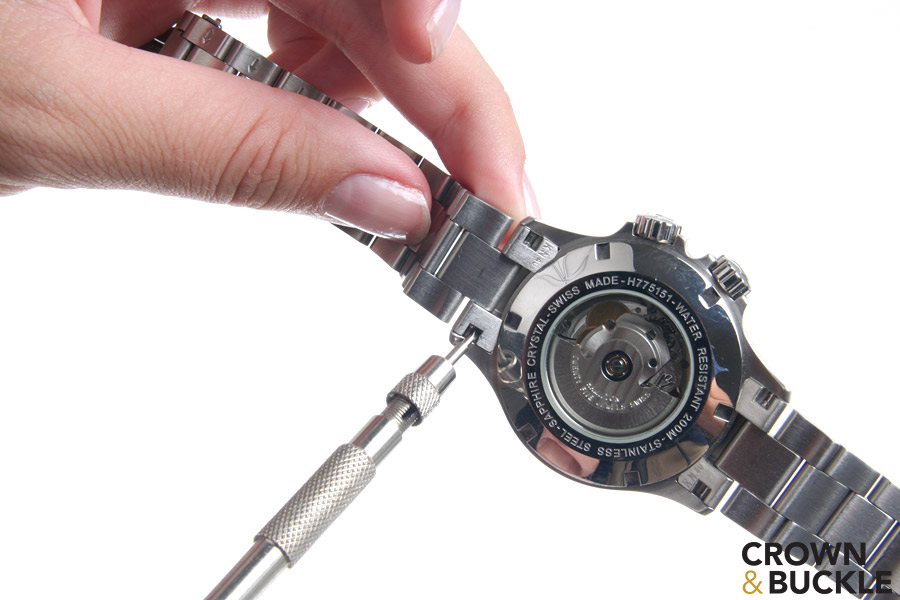
STEP 3
With the spring bar compressed, you will then wiggle the bracelet end-link out of the watch lug. To do so, you may have to compress both ends of the spring bar first, making sure the opposite end doesn't snap back into the hole. The end-links typically fit quite snugly, so this step might take a few tries.

STEP 4
After removing one side of the bracelet, repeat the same steps on the other side. You are all finished, and ready to install your new strap!

- Removing a Strap (Leather, Rubber, etc.)
STEP 1
From the back side of your watch, insert the forked end of your spring bar tool in between the strap and the watch lug. The spring bar has a ridge that the tool will grab, allowing it to be compressed.

STEP 2
Gently apply pressure inwards towards the strap (away from the watch) to compress the spring bar. At the same time, apply some downward pressure so the bar will pop out. Be measured with your force, as you don't want to slip and potentially scratch your watch.

STEP 3
Repeat on the other side, and you are all done! Remove the spring bars from the old strap, and reuse them to mount your new strap.
Modification
- Creating a "Single Layer" NATO
This is an optional modification, but it can be a game-changer for some. Removing the second layer of a NATO strap will allow the watch to sit lower on your wrist. The end result is a less bulky strap that wears more slim; great for those with smaller wrists. This mod allows you to position the buckle and keepers anywhere on your wrist. Instead of being on the side of your wrist, you could position the hardware to sit underneath. This modification can not be undone or reversed.
STEP 1
Remove the strap from your watch, and undo the second layer from the strap by pulling the long end through the floating keeper.
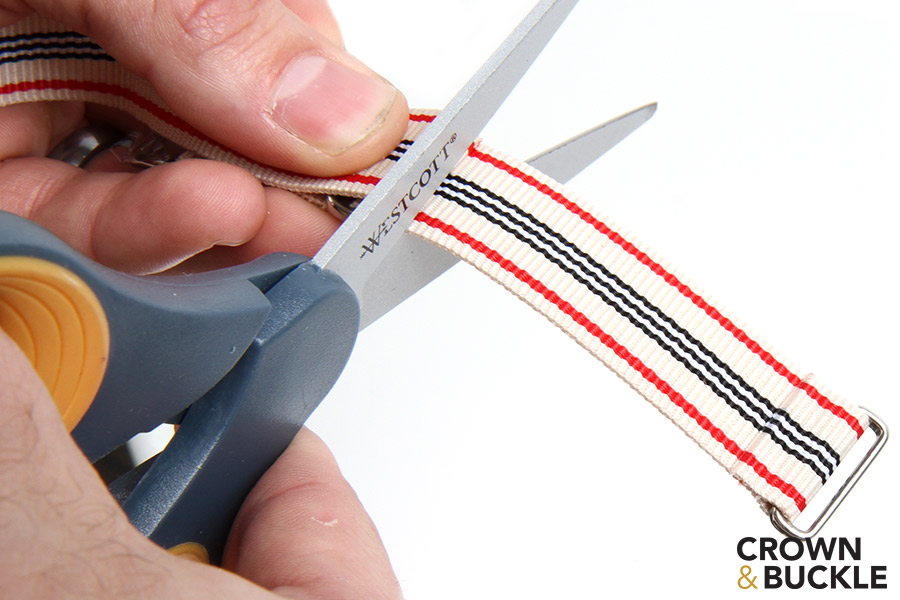
STEP 2
Peel back the second layer as close as you can to the last seam. Using a sharp pair of scissors, snip off the second layer. Try to cut cleanly in one fell swoop: do not "saw" at the nylon. This will minimize fraying.
STEP 3
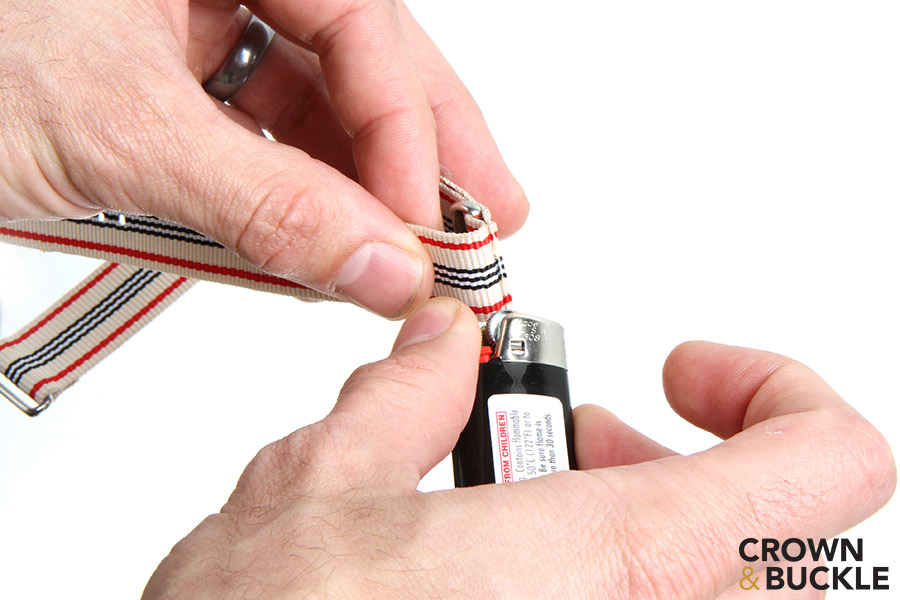
To seal the nylon and prevent future fraying, hold a lighter flame 1/2" away from the seam for 3-5 seconds, moving around slightly to evenly seal the nylon. Don't hold the lighter too close or for too long, as the flame could leave a carbon deposit on the strap. Once sealed, you can now reinstall the strap.
- Floating Keeper Options
This section deals with the floating keeper of 2-piece straps. The first section is useful for anyone that has noticed their floating keeper moving around a lot. The second section is for people that are on one of the last sizing holes of their strap, and deals with removing or repositioning the floating keeper.
GLUING KEEPER
If your keeper moves around a lot, glue it down. Put the keeper in a position that makes sense based on the sizing hole you use on the strap. Place a very small dab of fabric glue in between the keeper and the back side of the strap. Apply pressure for several hours while it dries. Now your keeper will stay in that perfect, fixed position.
LARGER WRISTS
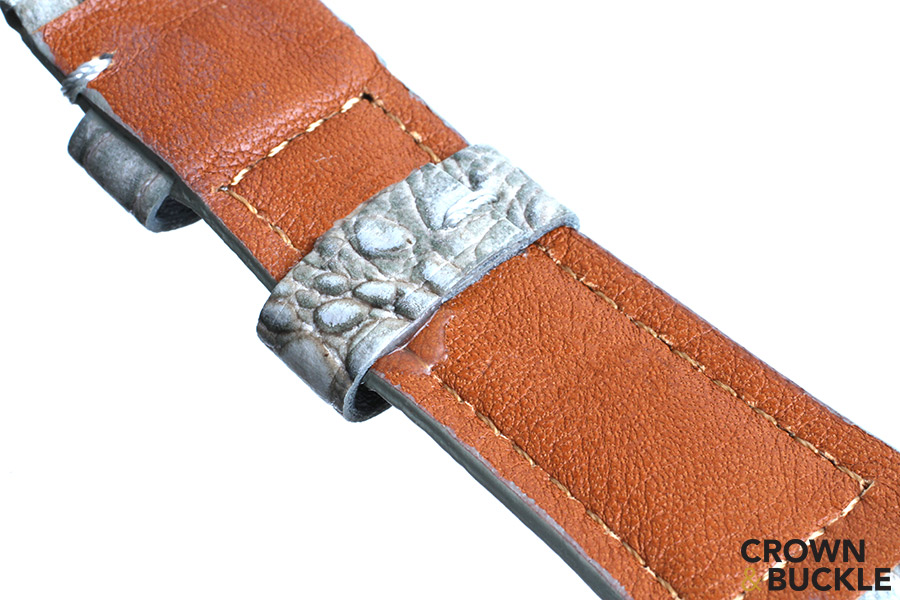
If you typically use one of the last (longest) sizing holes, the tip of your strap may not reach the floating keeper, as pictured.
REMOVE KEEPER
The easiest option is to remove the floating keeper entirely. It's not necessary if you are using one of the last holes. With the strap off the watch, you can simply slide the keeper off the end of the strap.

REPOSITION KEEPER
If you wish to retain both keepers, you can usually reposition the floating keeper in between the buckle and the fixed keeper. Begin by removing your buckle with the spring bar tool. * see next step *

REINSTALL
Slide the keeper off the end of the strap, and then slide it back on in front of the fixed keeper. Lastly, reinstall the buckle. This will not work with every strap, but it's a good option for some.

- Shortening a Leather NATO
This video is for shortening leather NATOs only. We don't recommend shortening nylon NATO straps, as they are difficult to cut cleanly. Instead, double-back the extra material, as shown on our Wearing a NATO page.
Other Topics
- Cleaning Nylon Straps
Keeping your nylon strap fresh is quite easy! It can be hand washed with mild hand soap and warm water. Whenever you wash it or otherwise get it wet, let it air dry. After swimming, rinse the strap with fresh water to wash away any chlorine or salt (a good practice for any watch/strap).
Being a densely woven fabric with hundreds of nylon strands, it's normal to have some fraying on the strap throughout its lifespan. To seal a fray, simply hold the flame of a lighter close to the nylon, but not directly touching it. A couple of seconds of radiant heat is all it takes to seal them up, good as new.
- Cleaning Leather Straps
We advocate the belief of "wear it and forget about it!" The longer you wear your strap, the better it will develop it's own natural patina and become a true classic beauty. If you need to clean the lining or the top-side leather of your strap, please be aware that cleaning and conditioning products are likely to darken the leather. Only use pH balanced, made-for leather cleaners and conditioners. We like Fiebing's or Lexol products (Lexol is commonly available at auto parts stores).
Using a soft cloth, apply a small amount of cleaner or conditioner to the strap. Work it in gently, then buff dry using a dry portion of the cloth. Remember, none of our leather products are waterproof, so avoid getting them soaked. Water aggressively dries out and shrinks leather.
- How to Wear a NATO Strap
Please see our Wearing a NATO page for detailed instructions.
- NATO Types: Standard vs. Premium vs. Heavy Duty
Please see our NATO Types page for a detailed run-down.